
We're proud to announce an update to our existing immersive reading tools for creators and publishers called PanelFlow™. These new features will make adding frames to your comics simpler and quicker so that you can get back to creating the comics for your readers.
What is Interactive mode?
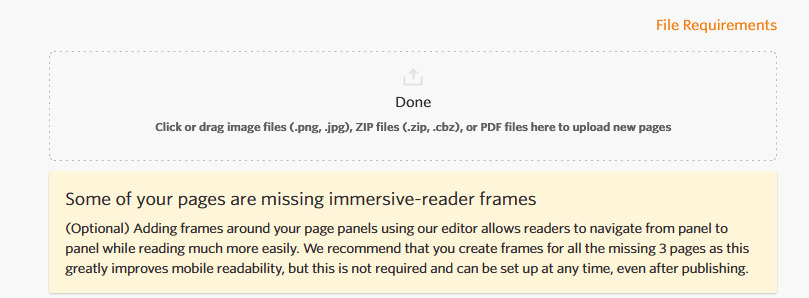
If you've seen the above warning on your releases, this is referring to interactive mode and frames that you can add to create a panel by panel reading experience.
Here are some notes to consider as we move forward:
- All pages must be interactive in order for panel view to be available to readers. If even one page doesn't have a frame on it, the reading mode will be disabled for the entire release.
- A page is interactive only if it has at least 1 frame. Covers, blank pages and/or full-page splashes will need a frame in order to adhere to this process.
- You can view which pages are interactive by viewing the comic at the "manage release" level. There will be a badge displaying "interactive" or "missing frames" depending on the status of the page.
How to use the tool
You are the “director”, guiding the user through the reading experience, and you have entire control for how you'd like to set up these pages. To open up the editor, click on "edit" under any of your pages.
Please Note: If your page has been inactive for 10 minutes, you will need to refresh the page to continue editing. Changes are saved automatically.
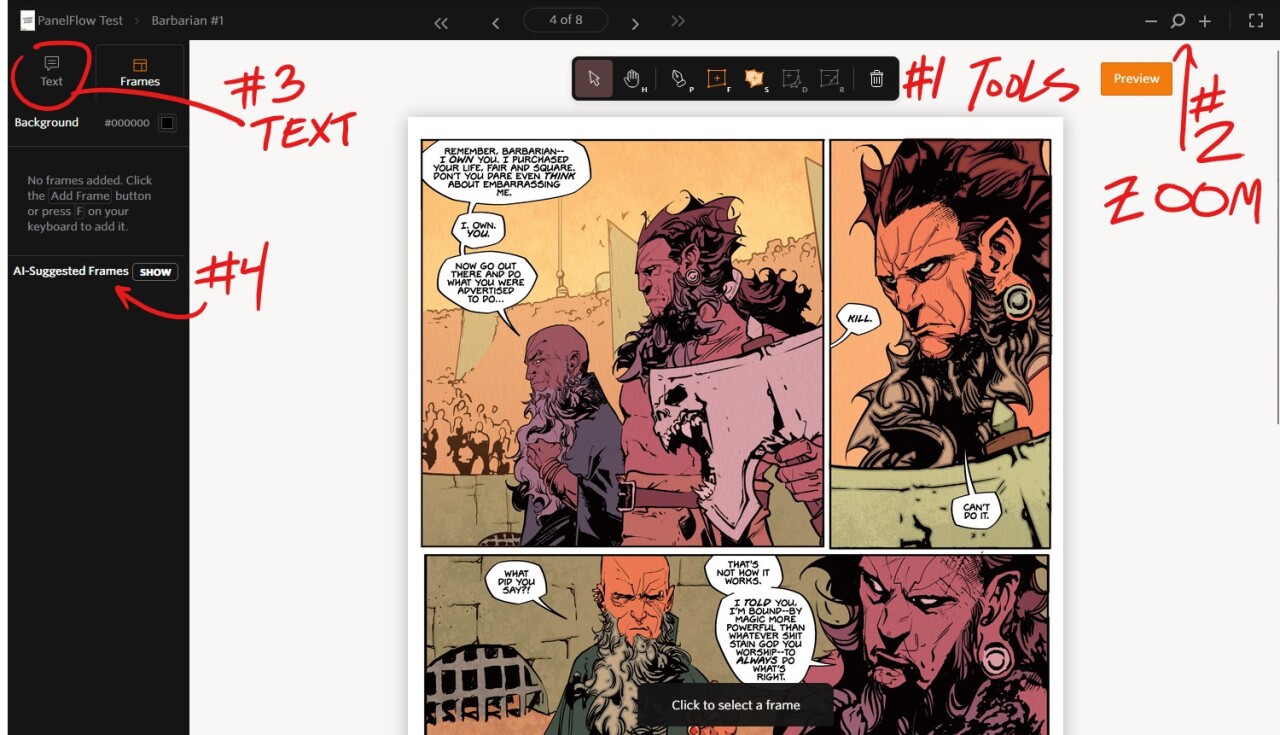
Your page should look like the above image once you open the editor. Let's explore this page and the tools available.
1. Toolbar
- Pointer - can be used to select panels
- Grab/Pan - can be used to manually navigate the page
- Pen - this will be used to add multiple points to a frame, enabling you to easily navigate oddly shaped panels
- Shortcut: P key
- Create Frame - this will be your most-used aspect of the tool
- Shortcut: F key
- Shortcut: F -> A will create a full page panel
- Smart Frame Creation/SAM Assist - this is used to capture high resolution object framing
- Shortcut: S key
- Add Object - use this when the panel requires you to include a shape breaking/exiting the frame
- Shortcut: D key
- Remove Object - the inverse of the tool above, use this to exclude a shape breaking/entering the frame
- Shortcut: R key
- Delete Active Fragment - this deletes the panel in entirety
2. Zoom
By clicking on the - or + buttons, you can Zoom in / out. I would not suggest using Ctrl/Cmd for this, as it will affect your browser page as a whole, rather than your page.
3. Adding Text and Viewing List of all frames
- Text - N/A at this time, this will be covered in a different article
- Frames - this is a list of all the frames for the page. View each frame, one at a time. Frames can be rearranged or deleted from this view. As you make frames, you can view a list of them here, much like layers in a software file. You can even drag them into order by click+hold+drag if you accidentally create them out of order.
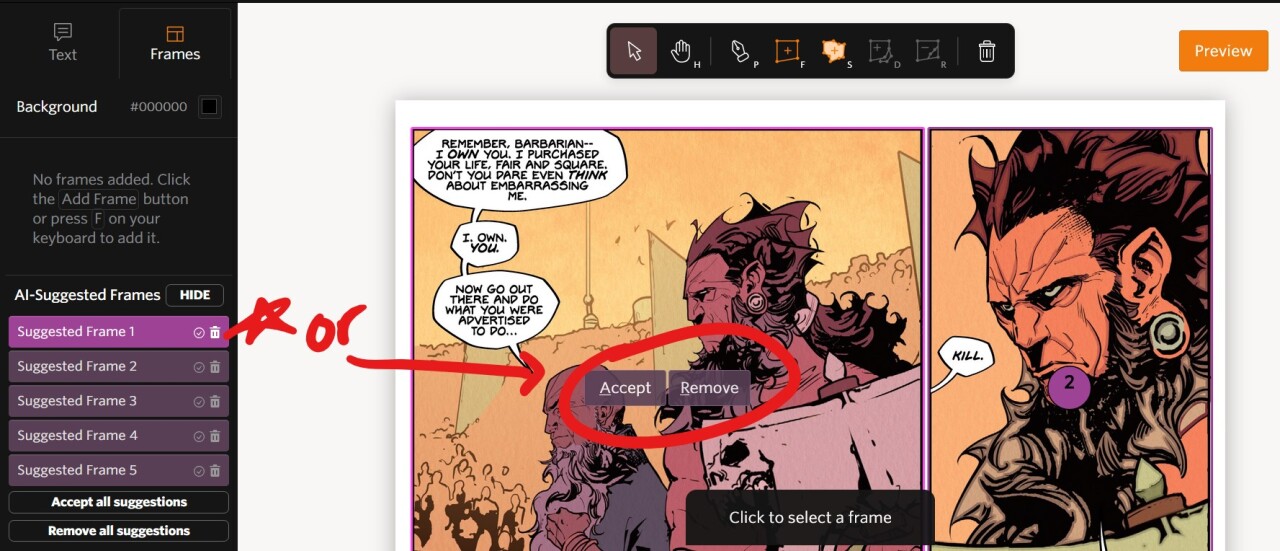
4. AI-Suggested Frames
We’re in the process of rolling out a new tool that utilizes AI and object detection to recommend how the frames should be laid out. Please note that this AI tool is not in any way related to generative AI. It is a smart tool that looks at the lines and negative space within a page to identify where panels end, or where "breakout" panels exist to make paneling easier. Your work is not being scraped in any way.
- As you enter PanelFlow™ view to edit a book, take a look at the AI-Suggested Frames toolbar along the left side of the screen. You may need to click “Show” to show the options provided by the tool.
-
Upon review of each individual frame, you can click on the Checkmark or Trashcan to accept or reject any suggested frame. If you'd prefer a shortcut tool, you may accept on an individual basis by clicking + hovering over the panel.
-
You can also click the check icon or “Accept all suggestions” or inversely, if you do not want to utilize the AI suggestions, you may click the trash icon or “Remove all suggestions”.
-
Note that if you like a suggestion, but want to make changes to the panel, you can accept the panel and then edit it afterwards. This is a great way to get most of the work completed, and only need to make small edits to the frames. Work smarter, not harder!
5. Creating Frames
So now that we've explored the tools that we have available to us, let's go step-by-step using those tools manually if you don't want to utilize the suggested frames we just covered.
- Click the Frame button or press the “F” hotkey to enter frame drawing mode
- Draw the frame
- When your frame is adhering to a standard comic panel, try to rest the lines within the black panel (not outside of the panel, if possible).
- You may also utilize the Pen tool when paneling oddly-shaped panels with angles.
- Enter Pen mode by clicking the button or pressing “P”
- Click for each point you’d like to add to the panel
- Upon completing the frame, either click “Accept” or press “A”
- Full page frames
- This is a “full page frame” so we want to frame the entire page
- As practice, frame the full page manually then delete the frame
- Next, frame the full page using the hot-key combination: F, A (F enters frame mode, hitting A executes “frame all”)
-
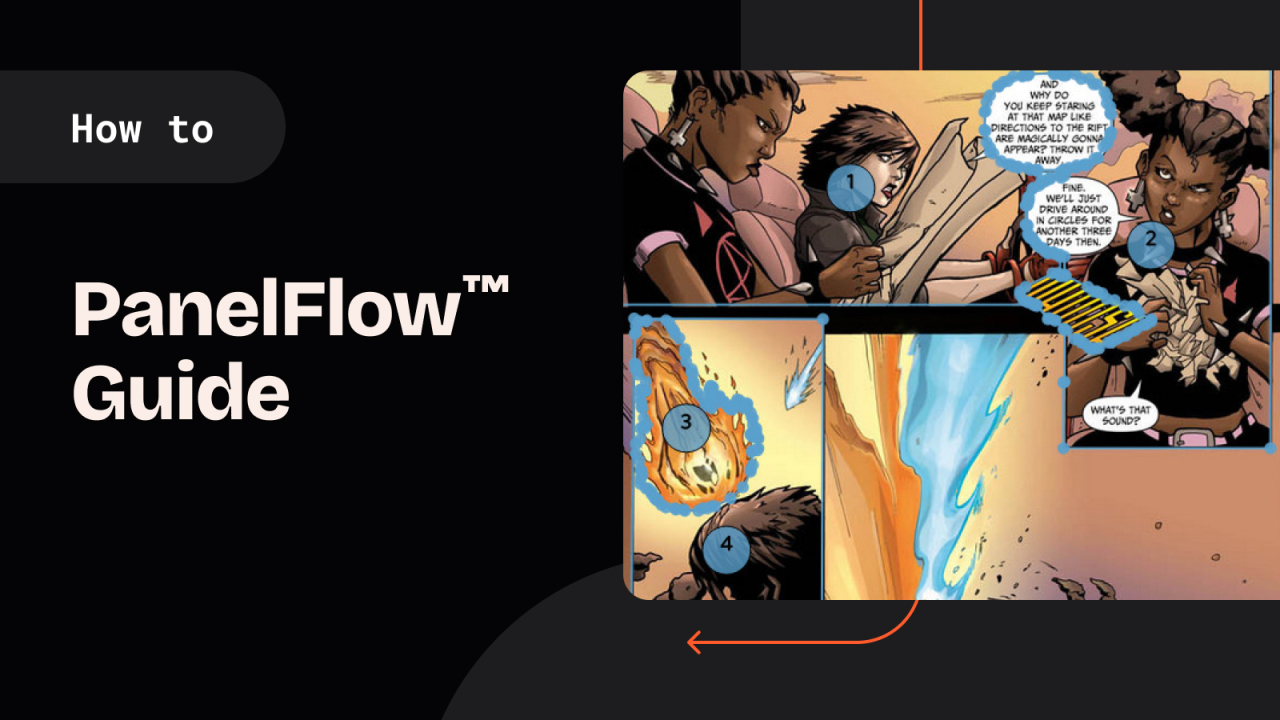
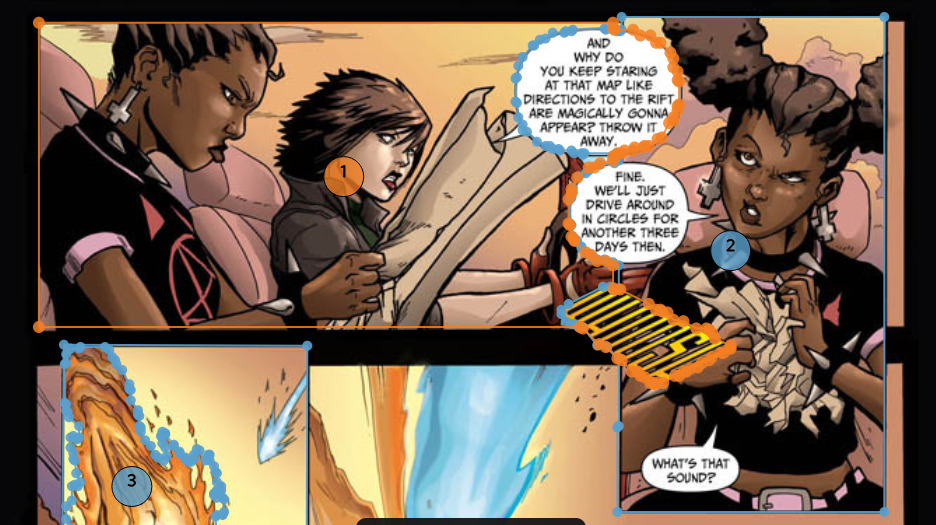
Modifying Frames with the "Add Object" and "Remove Object" works best with "Breakout Panels" or panels where the subjects or action breaks out of the panel borders themselves. Sometimes this can be due to speech bubbles or SFX as well. The orange frame above is Frame 1, and you can see how it adds the first speech bubble
-
After creating the first panel, create and manually adjust the second frame with the characters in the car to only include the necessary panels.
-
Use the “Add Object” function to add the top speech bubble
-
Use the “Remove Object” function second bubble
-
Use the “Add Object” function to add the “Whoosh”
-
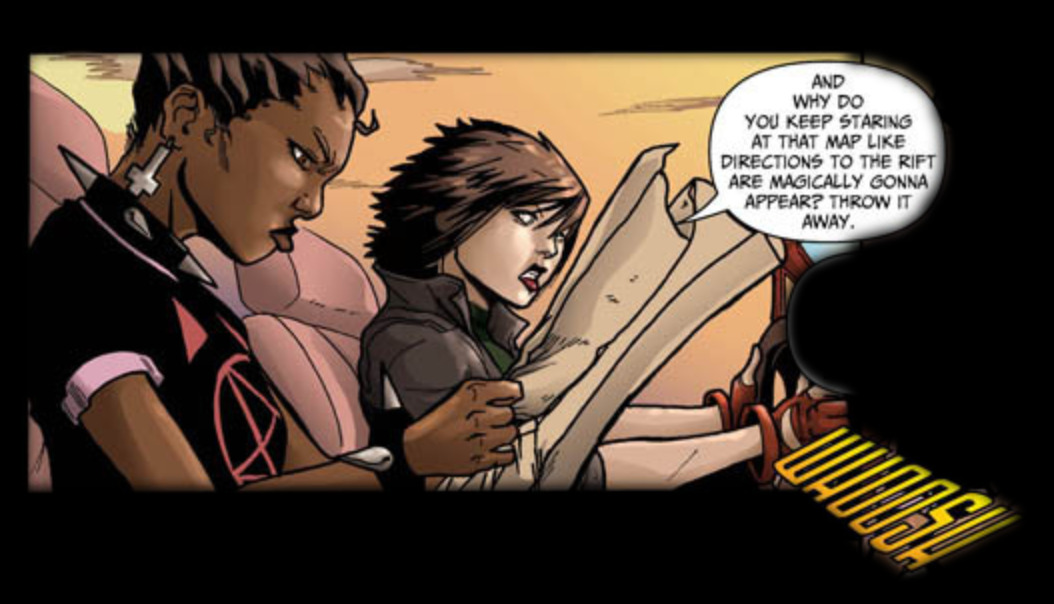
Once you are done, you should have something that looks like this when you view the preview:
- Utilizing SAM Assist
- Utilize the SAM assist tool to bring additional attention to specific details you want to highlight inside the panels by making them their own frames. Often these objects have irregular shapes, and the SAM assist will make getting that object into its own frame much easier.
- Adding Vertices
- You can use vertices to capture the full frame if your panel is at a different angle. Create a box that captures the entire panel, and then click along the panel frame to add additional vertices.
- Rearranging frames
- On the left of the editor, you can see a list of your panels with a corresponding number on the page itself. If your panel frames are out of order, you can drag them into order by clicking and dragging the hamburger menu icon (three stacked horizontal lines).
- Using Remove Object
- You can utilize the Remove Object tool to remove any bubbles or text that overlaps into another panel if you want to control when someone sees a specific bubble or text within a specific frame.
Using all the tools mentioned in this article, you can get a result similar to our example below from Katrina Hates the Dead from Wannabe Press.
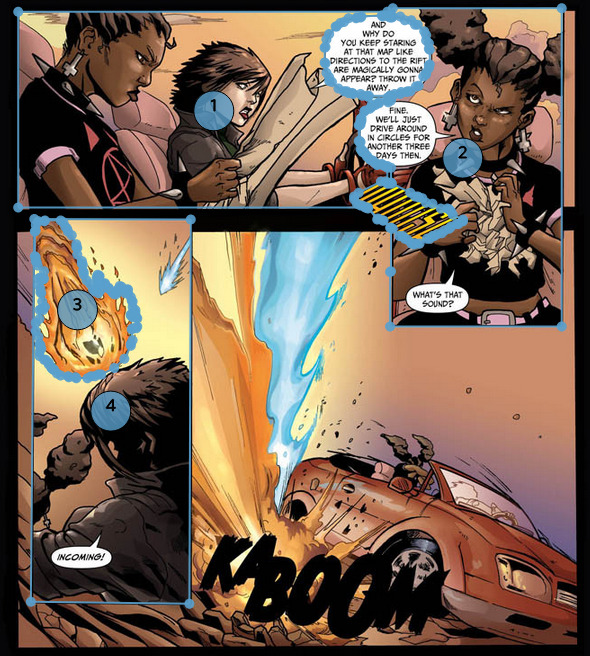
With all of those changes, we'll have a series of frames to allow us to control the flow of readership for the best possible experience. Sometimes highlighting objects or parts of a panel, then zooming out to see the bigger picture can make a large impact on the reader. Think creatively and experiment!
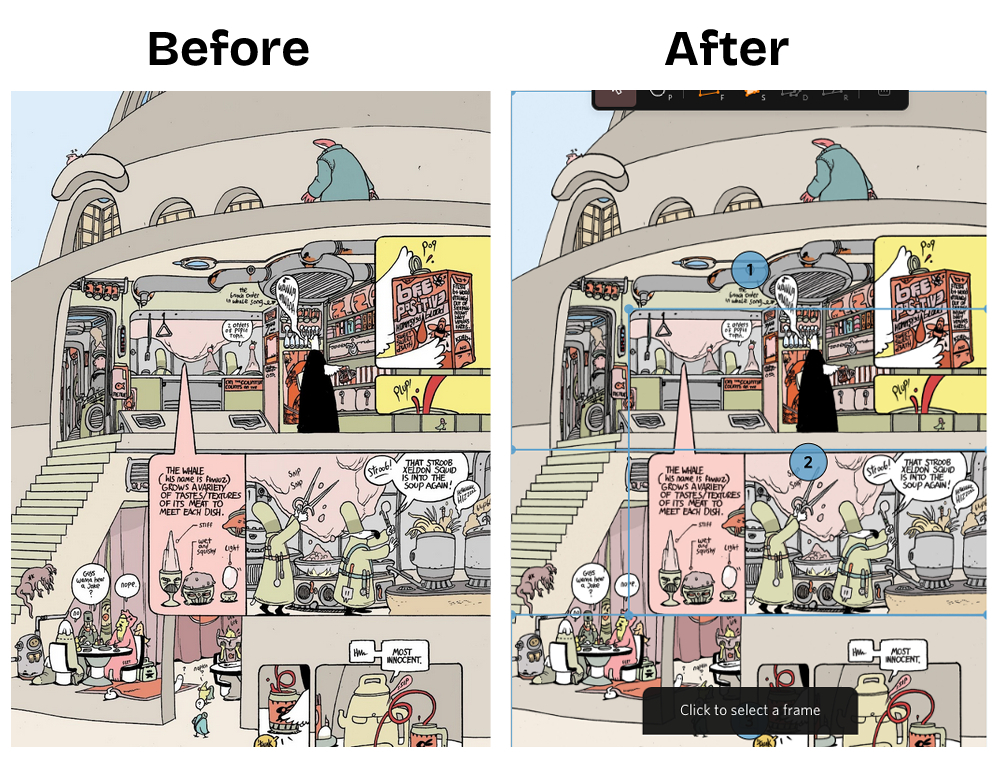
6. Judging Panels
- This is a full page panel, so we’ll need to exercise our best judgment on how to divide it up.
- We would recommend beginning with a full page panel, followed by a panel capturing the top half of the page, ending with a panel capturing the bottom half of the page
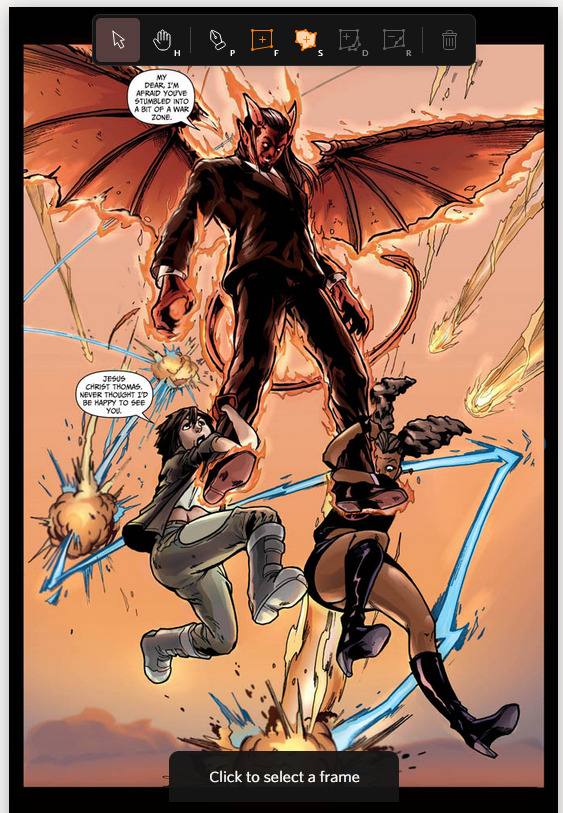
- Select object frames / high fidelity frames
- Ideally, our top content will have a few instances of high resolution object framing to really make the comic experience pop. That means that while this page could be acceptable as a regular frame, but let’s use this as an opportunity to make the experience more immersive! Frame each of the three characters using SAM Assist followed by capturing the frame in full and preview the panel
- Ideally, our top content will have a few instances of high resolution object framing to really make the comic experience pop. That means that while this page could be acceptable as a regular frame, but let’s use this as an opportunity to make the experience more immersive! Frame each of the three characters using SAM Assist followed by capturing the frame in full and preview the panel
7. Things to keep in mind as you add frames to your pages
- Covers and credits/information pages can be captured using a single, full page frame.
- Back-matter and/or cover galleries can be captured in full page panel view. You may forego breaking pages like these down into smaller panels.
- Full or ¾ splash pages should either begin in full page view in an effort to remain faithful to the art as the creative team intended. Otherwise, the page should be segmented to follow the narrative.
- Judge the panel for the smoothest experience. We should be mindful to only include what is relevant to the narrative and/or experience. For instance, if there is a bold frame, try to place the panel within the borders of that frame so that only the art is highlighted in panel view. Alternatively, if the frame is thin or non-existent, set the panel in a way that excludes art from outside the frame to the best of your ability.
If a page contains multiple panels, but is meant to be viewed in full page at first, use your best judgment and panel with the spirit of the frame in mind.
For example, this page should begin with a full page panel to capture the artist’s intent of the page being viewed as one complete piece, followed by the top half of the page, then moving to the panels in reading order.
Are there any paneling instances/challenges not covered in the guide above? Please feel free to leave a comment, and we can add it to the guide. We would also love to hear your feedback on the new features.
You can also join our Discord server to talk with other readers and creators, get feedback on your PanelFlow™ setup, or talk to GlobalComix staff for help.